Translate

2/27/11

Easy Apple Tart

Preheat oven to 400 degrees F. and assemble a 12" tart pan.

The original tart is adapted from one seen on French Cooking at Home by Laura Calder, she is my new favorite inspiration. She is a delightful 30 minute break in my day full of new ideas and not particularly difficult dishes with fun music. I just really think she is a fun break so I try not to miss it


Her tart was 8" so I did some adaptation to my accommodate my larger 12" tart pan.

Here is what you need for the crust:

3/4 C. butter
1/2 C. sugar
3/4 t. vanilla
1 1/2 C. flour

Cream the butter and sugar then stir in the vanilla. Mix in the flour to make crumbles. Pour into your pan and press into place. Press it into the bottom of the spring form or a tart pan and give it about a 1" rim. Bake for 15 minutes until golden. Remove from the oven.

Here are the ingredients for the filling:

12 oz. cream cheese
6 T. Sugar
1 lg. egg
3/4 t. vanilla

While the crust bakes, beat together the cheese, sugar, egg, and vanilla until smooth. Make the topping by tossing the apples with the cinnamon and sugar. You may also add nuts at this time if desired.

Topping:

4 apples peeled and sliced
3/4 t. cinnamon
6 T. sugar
1 /4 C. almonds or walnuts chopped optional

Remove the tart shell from the oven. Spread over the cheese mixture. Arrange the apple slices on top and scatter with the optional nuts if desired. Bake until the apples are tender about 40 minutes
Serve with whipped cream or ice cream if desired.

2/25/11

Homemade Croutons

For a really long time I have thought the reason for so many health issues is the chemical pollution we all exist in as we live our day to day lives. We breath it, we eat it, we really cannot escape it.
My thought is we can limit it and preparing our own families food and eating as much fresh non processed food as we can is a start.
Simply by making your own bread and even to toast your own croutons you eliminate a ton of additives. Just read your bread's table of ingredients!! My thought is if I can't pronounce it I sure shouldn't be eating it. Bread machines are wonderful, I wore mine out so I just make it by hand now.

These croutons are so yummy you may want to eat them just as a snack but if you resist that temptation enjoy them sprinkled over you salad or as a topper over a hot steaming bowl of soup.
You may use any bread you have. This batch is from a few pieces of sourdough from last week.
The secret is the seasoning. Use whatever you like including herbs and powdered cheese if that sounds good to you. I used my standard "house seasoning" and olive oil.

Preheat the oven to 250 degrees F. I like to line my sheet pan with foil for quick clean up. Toss your cubed bread in whatever size you have opted for with olive oil on the sheet pan and sprinkle with you seasonings of choice and toast for an hour at 250 degrees turning once midway through the time.

My bread was reasonably dry and one hour was perfect. If your bread is moist you may want to extend the time until they are dry and crisp.

2/24/11

Creamy Potato Salad and Cream Cole Slaw

My daughter-in-law's Father had his 70th birthday this past weekend and my Granddaughters helped me with the food preparation for their Mother who was planning a party for him.
She just called me and requested the recipes for the slaw and the potato salad as several are asking for them. I am flattered they think I am a caterer!! Even more so they have requested my "secret recipes"!!
When I looked back into this blog I did not see that I have ever shared these two so here you are, the two most requested recipes from the party.
The potato salad:
3-4 lb. white potatoes peeled and boiled to fork tender, do not overcook
2 C. celery cleaned and sliced
8-10 hard boiled eggs peeled
salt and pepper
Drain the potatoes and cool enough to touch. Cut into bite size pieces and combine in a large bowl with the celery and chop the eggs into the rest of the ingredients. Sprinkle with salt and pepper and set aside while making the dressing.
The Dressing:
1 1/2 C. Hellman's mayonnaise
1 1/2 T. Grey Dijon Mustard
2 T. sugar
1/2 t. celery seed
Whisk the dressing ingredients all together and pour over the potato and egg mixture. Stir well. If the mixture is a bit too dry pour sweet pickle juice a tablespoon at a time over the salad and continue mixing until the consistency is where you like it. Taste and adjust the salt and pepper if needed.
This potato salad is excellent served immediately or chilled and served cold.

The Creamy Cole Slaw:
1 medium head or 1/2 large head of green cabbage shredded (2 or 3 pounds)
1/4 medium sweet onion finely diced
1 shredded carrot optional
1 C. shredded red cabbage optional
Combine the shredded vegetables in an over sized bowl. Set aside and make the dressing.
The Dressing:
1 1/2 C. Miracle Whip Salad dressing
1/4 C. cider vinegar
1/2-3/4 C. sugar, TASTE AS VINEGARS DIFFER IN ACIDITY
1/2 t. salt
1/4 t. pepper
1/4 t. celery seed
Whisk all of the ingredients listed together.

About 20 minutes before serving toss half of the dressing with the slaw until well coated adding additional dressing as needed. the slaw keeps well in the refrigerator for 3-4 days before becoming water logged.
If you have dressing left just store covered in the refrigerator. It is delicious over lettuce salad with onion and tomato and hard boiled egg.

2/23/11

Pot-au-Feu (Well maybe not)

The traditional Pot-au-Feu is a rustic beef stew with rather large chunks of beef instead of the smaller ones I normally would use. It is also flavored with a bouquet garni of parsley, thyme, and bay leaf.

There are fewer vegetable varieties in this than I would normally use and it is much mellower in flavor. I tend to use garlic, dried hot peppers, and hot sauces to give my standard vegetable soup quite a zing.
Since I had a large group of people and children I thought it a good day to try a variation that would be hearty and meaty in contrast to the mellow noodle soup. But, I didn't want the hearty part to be spice, rather depth of the beefy essence.

To make the bouquet I combined the crumbled spices and placed them in a mesh tea infuser. This enabled me to flavor the soup and remove the pieces of the herbs before serving. 

1 bouquet garni
3 1/2 lb. lean trimmed chuck roast in large chunks (about 3-4 bites to a chunk)
1 soup bone with marrow
6 C. beef broth
1 onion diced
5-6 carrots peeled and chunked
5-6 medium potatoes peeled and chunked
3 ribs celery washed and chunk ed
2 C. green beans washed and snapped
1 1/2 t. salt
3/4 t. black pepper

Using a large heavy bottomed kettle or dutch oven combine the broth, soup bone, beef chunks, onion, and bouquet garni and bring to a boil. Reduce the heat to low and simmer for 2 1/2-3 hours covered.
Add the vegetables and seasoning and simmer another 30-40 minutes. 

Remove and discard the soup bone and bouquet garni. Taste again and correct the seasonings. Ladle into warmed bowls and enjoy with buttered hot rolls.

2/22/11

Chicken Noodle Soup

Saturday we had all of our Children and Grandchildren here and I just had homemade soups and cupcakes. It was hot and tasty and simple. Everyone just helped themselves. Actually I made two pots of soup and I thought I would share the chicken with you today. 

Ingredients:

2 qts. chicken broth (homemade or store bought)
1 whole boneless skinless chicken breast ( about a pound)
1 large onion diced
3 carrots, peeled and sliced
3 ribs of celery cleaned and sliced
1/2 pkg. dried medium noodles
parsley, optional
salt and pepper

Place a large heavy bottomed kettle or dutch oven over medium high heat and add the broth. Bring to a boil and turn back to simmer. Add the chicken and simmer covered for 15 minutes, do not boil. Remove the cooked chicken to a plate and set it aside to cool. When cool dice into bite sized pieces.
Return the broth to simmer and add the vegetables and cook them until they are fork tender. Season with salt and pepper. If additional liquid is needed add water or broth and fortify as needed with chicken stock base. Add the chicken, dried noodles, and parsley if desired.

As soon as the noodles are tender ladle into warm bowls or mugs and serve with fresh crispy saltine crackers and large spoons.


2/18/11

Crusted Trout 'n Fries

Two beautiful trout will make diner for my husband a delight.  He loves fresh fish.  He loves them fried but hasn't figured out yet that I have been crusting them and he is really happy with what is showing up on his plate.  These are not fillets but dressed whole fishes with the heads removed.

You will need 2 fresh trout
1 egg beaten well
4-6 T. water
hot sauce
salt
pepper
2-3 C. crushed plain corn flakes
butter flavor (or other your choice) cooking spray

Preheat the oven to 425 degrees F. and line a large sheet pan with foil.  Coat the foil well with cooking spray and set aside.

Wash and dry the fish.  Lightly salt and pepper them inside and out.  Place the beaten egg, water, and hot sauce in a long narrow dish and mix well.  Dip the fish in the egg mixture and roll until well coated.  Toss the fish onto a large platter with the corn flake crumbs rolling them until well coated.  Spray them with butter flavored cooking spray.  Carefully place the fish onto the prepared pan and oven roast about 12-12 minutes on each side.  The fish is done when it flakes.  Cooking time depends on the size of the fish.


Hand Cut French Fried Potatoes Frying in Canola Oil at 350 degrees F.
Serve with fresh lemon wedges and hand cut french fries.

2/17/11

Sourdough Bread

Yesterday morning was the big day. I was determined to start sourdough bread from the homemade starter, stirred up on Saturday 2/12, as it was 5 days now and the time was here. I perused my resources, numerous cookbooks, magazines, catalogs, the King Arthur website, and my favorite blogs. I choose to adapt a recipe from Annie's Eats as she does a spectacular job and as usual I was not disappointed.

Here is what you need for my version:
1 1/2 C. warm water (100 degree F.)
4 t. active dry or instant yeast
1 T. honey
1 C. sourdough starter
2 C. first clear flour (King Arthur specialty)
3 1/2 - 4 C. bread flour plus more if needed
1 T. butter at room temperature
2 lg. eggs at room temperature
2 1/2 t salt
1 t. bread flour mixed with 1 T. yellow corn meal

NOTE: The bread will be successful if you use 5 1/2 - 6 C. bread flour instead of partial amount of first clear. I just prefer to use it and have for many years.

Fit the whisk attachment to your electric mixer and whisk together the water, honey, yeast, and sourdough starter until just smooth. Cover the bowl with plastic wrap and let stand at room temperature for about an hour and is slightly increased in bulk and bubbly.

Using the flat beater attachment on low speed add 3 C. of the flour, butter, eggs, and salt. Increase the speed to medium low and mix another minute until smooth. Add 2 C. more of the flour and beat for 2 minutes.
Attach the dough hook and turn the mixer to low speed. Add all of the remaining flour 1/4 C. at a time until a very soft dough is formed and pulls away from the sides of the bowl. Knead on low speed for about 6 minutes adding a tablespoon of flour at a time if the dough begins to stick to the sides of the bowl. The dough should be smooth and elastic, tacky but not sticky.
Prepare a heavy glass or pottery bowl for the dough to rise in by filling it to the top with hot tap water. Let it heat through then empty the water, dry the bowl, and quickly butter or oil it.

Form the dough into a ball and transfer it to the prepared bowl. Turn the dough once to coat all sides. Cover loosely with plastic wrap and let rise until doubled, about 1 1/2 -2 hours.

Meanwhile line a baking sheet with parchment paper or a silicone baking mat. Sprinkle generously with the flour and cornmeal.
When the dough has completed it's rise turn it out onto a floured work surface and divide it into two equal portions. Form each into a tight oval loaf. Place the loaves on the prepared sheet several inches apart. Sprinkle the tops with the flour and cornmeal pressing it in gently. Cover loosely with plastic and let rise in the refrigerator for 8 - 12 hours.

Preheat the oven to 450 degrees F and place the rack to the lowest position in the oven. If you have a baking stone place it on the rack and let it preheat too. If you do not have a baking stone use an overturned baking sheet. Using a thin sharp knife make three slashes atop each loaf. Place the baking sheet on the baking stone and bake for 10 minutes. Reduce the oven temperature to 400 degrees F and continue baking for 25-30 more minutes until the loaves are golden brown. Let cool completely on a wire rack before slicing and serving.

2/16/11

Lemon Meringue Pie just" hurries up" Spring for me!!!

I spied a package hiding in my freezer with just enough pastry for a single crust pie on the same day I found I had lemons that needed to be used. Mother of invention!!! There is nothing more fitting for a February day when the temperature is to hit 70 degrees or at least play with 70 degrees, than a lemon meringue pie.

I had enough forethought to set the pastry from the freezer into the refrigerator last night so all there was for me to do was to roll it, dock it, spread dry beans in and and bake. And so it went.
It baked at 400 degrees for about 20 minutes and I took the foil and beans out and returned it to the oven for about 6-7 minutes until nicely browned.

Meanwhile I made the lemon filling for a 9" crust like this:
1 3/4 C. sugar
1/3 C. plus 1 T. cornstarch
4 egg yolks beaten slightly
1 1/4 C. water
3 T. soft butter
2 T. lemon zest
3/4 C. fresh squeezed lemon juice


Stir together in a heavy bottomed (keeps it from scorching as easily) medium saucepan the sugar and cornstarch. Blend the egg yolks and water and pour into the sugar mixture stirring to incorporate. Cook over medium high heat stirring constantly. After it comes to a boil continue to cook and stir for 1 full minute more. Remove from the heat and stir in the butter, zest, and lemon juice until the mixture becomes smooth and shinny. Immediately pour into the baked pie shell.
Quickly make the meringue as follows:
4 egg whites
pinch of salt
1/4 t. cream of tarter (optional I usually don't use)
6 T. sugar
1/2 t. vanilla (optional)

Beat the egg whites, salt, and cream of tarter until foamy. Beat in the sugar about a tablespoon at a time until the mixture is smooth, glossy, and maintains stiff peaks. Then stop. If you over beat you will get a sort of clumpy meringue you don't want.

Immediately heap the meringue onto the hot pie filling and spread carefully sealing the meringue against the edge of the crust to seal it. Bake at 400 degrees F for 7-10 minutes until golden brown and set aside away from draft to cool.

What's left after dinner.....YUMMO!!
Note: I have shared two of my pie crust recipes, one is posted "Pastry for Three Crusts" on 10/29/10 and another is under "Lemon Pie for 1 or 2 or more" on 9/15/10 so I didn't repeat them.

2/14/11

Sourdough Starter from Scratch

2 day old sourdough starter
Over the years I have made sourdough bread many times. Always from a purchased starter that was in a dry form you added to and had good success. Ultimately I would get out of the habit of making sourdough and let the starter run a muck.
Recently I was reading the King Arthur Flour Website and happened upon how to start your own starter from scratch. I found it really interesting and of course....got the bug and started one of the versions.
To make starter you need:

2 C. warm water, (preferably non chlorinated)
1 T. sugar or honey (I used honey)
1 T. or packet of yeast
2 C. King Arthur Unbleached All-Purpose Flour
Pour the water into a 3 or 4 qt. glass or ceramic jar or bowl and add the sweetener and stir to dissolve. Add the yeast and stir to dissolve. Gradually stir in the flour. Cover the container with a clean kitchen towel and place it in a warm place. Do not use plastic wrap. You want to capture any wild yeasts in the air and let them pass into your brew!! The towel will allow this.
The mixture is very active and will bubble and brew. Let it work from 2 to 5 days, stirring about once a day as it will separate. The bubbling should subside and smell yeasty, sour aroma when it has developed. Stir once more and refrigerate in a jar with a tight lid until ready to use.
To keep it going you have to feed it occasionally and if you remove some to use it will need replenishment. I will write more about this as I go along in the process or please feel free to check out yourself at the King Arthur site.
I think it looks really funky so I wanted to take a picture so if you try this you will not be surprised.

Mine ran over onto the kitchen cabinet right away the day I started it so beware and use a large enough container.

Roasted Beef Tenderloin

There was a wonderful sale on beef tenderloin this week and it was truly too good to pass up, so I bought one. Would you even believe $5.49 @ pound??? The butcher trimmed it for me and removed the silver membrane. I asked him to also give me the trimmings because when ground it becomes the most delectable chopped steak I have ever eaten.
I shaped the meat into a roast by tucking both ends under and tieing with butchers twine. Next I slathered it with 2 T. soft butter so my seasoning would cling. I mixed 3 parts Kosher salt, to 1 part garlic powder, onion powder, and lemon pepper. After using this liberally I coated generously with fresh rough cracked black pepper and pressed all together with my palms to get a good adherence.
Meanwhile my oven was preheating to 500 degrees F. and I lined a lipped pan with foil and lubricated it with grape seed oil. The roast was centered in the pan and roasted for 30 minutes prior to my opening the door to check it for the first time. The roast weighed about 5 pounds before trimming.

The meat thermometer read 110 degrees so I returned it to roast, setting the timer an additional 10 minutes. I wanted to remove at a reading of 150. It took 20 more minutes to achieve the desired
doneness. 140 is rare, 150 medium and 160 well done on my meat thermometer.
Upon removing the roast I covered it with foil and let it sit 15 minutes before slicing while I made the salad and finished the potatoes. The roast was truly delightful and got rave reviews from everyone. The men especially cheered and grabbed the few slices left on the platter to make sandwiches for their lunch.

2/13/11

Heathbar Toffee Bar Cookies

I love Heathbars and when I saw a bar cookie recipe that called for toffee bits the light bulb flashed.  I keep a goodie bag of Carmel's, red hot candies, Heath bar chips, chocolate chips, white chocolate chips and anything else that strikes my fancy for just such occasions!!! I have a very cold closet that is just right for the storage of such special treats purchased on sale and tucked away.

My adaptation of these bars is taken from a recipe from Annie's Eats blog called Chocolate Toffee Shortbread Bars.

Here is what you need for the base:

1 1/2 C. flour
1/2 t. salt
1/4 t. cinnamon
1 C. butter at room temperature
1/2 C. packed brown sugar
1/4 C. sugar
1 t. vanilla
3 Oz. chopped semisweet chocolate

Here are the topping ingredients:
6 Oz. semisweet chocolate chopped
1 1/2 C. Heathbar bits (These can be purchased or I have broken the bars myself with a rolling pin.)

Preheat oven to 375 degrees F.  Line a 9 x 13" pan with foil and lightly butter or spray with nonstick product.  Measure the flour, salt, and cinnamon, toss together and set aside.  Using a large bowl cream the butter, vanilla,  and sugars until fluffy, about 3 minutes.  Beat in the dry ingredients a little at a time on the lowest speed of the mixer just until incorporated.  Stir in the chocolate evenly.

Turn the dough into the prepared pan and spread evenly with an offset spatula.  Bake for 19-20 minutes until puffed.

Remove the pan and quickly sprinkle the second amount of chocolate over the base evenly.  Cover the entire pan with foil tightly and leave for 5 minutes.  Remove the foil and again using an offset spatula spread the chocolate evenly over the entire base.  Immediate sprinkle the Heath Bar Bits over the warm chocolate.  Using you hand inserted inside a small plastic bag quickly press the sprinkles down so they adhere to the chocolate layer.  Set aside and cool to room temperature.  Once the cookies are cooled and set slide the foil off onto a cutting bar and slice into bars.  Store in an airtight container with wax paper between the layers if they are stacked.

2/11/11

Grandma's Hearts, cookies for my kids.

I am no expert at decorating but I try to jiggle and make a little squiggle and dot here and there for holidays. This is a terrific cookie recipe and it makes about a dozen large cookies, just right for my purposes. I think I first saw this recipe on Annie's Eats but it is a hand written recipe so I can't be sure.  I like it because it calls for a lot of Almond flavor and the dough is really easy to work with.
Sugar cookies:

2 sticks soft butter
1 C. powdered sugar sifted
1 egg room temperature
1 1/2 t. pure almond extract
1 t. pure vanilla extract
1/2 t. salt
2 1/2 C. flour sifted.
Combine butter and sugar in mixing bowl and cream well. Add egg and flavorings and continue beating. Sift the flour and salt together and add to the butter mixture. Beat until it forms a stiff dough then gather it together in plastic wrap and refrigerate until firm.
Preheat the oven to 375 degrees F. Prepare pans with parchment paper. Roll the chilled dough to 1/4" thickness and cut shapes with floured cookie cutters. Bake 9-11 minutes depending on the size of the cookies. Remove and cool. Frost with your favorite icing and enjoy!!!

Making Soup Stocks

Sometimes when I make a run to the grocery for some item I am caught off guard and find a bargain. Since I tend to be frugal but won't give up quality I like to take advantage of something worthwhile. i caught some chicken marked down for quick sale on Monday. It had a sell by date of Tuesday. The packages were legs and thighs and a cut up chicken. They were a little over 6 pounds all told. That is exactly a good quantity to make a big pot of soup stock for the freezer. I already had everything else I like to use so off I went with the chickens.
Here is what I used for the Chicken Stock:

6 1/2 pounds of assorted chicken (I have used all backs and wings or any combination will do)
5 carrots rinsed, trimmed and broken in half
5 stalks of celery rinsed and broken in half
1 large onion rinsed off and quartered (I leave the paper like skins on for color)
1 bay leaf
8 qt. water
1 t. salt
1/2 t. pepper
Note: In the past I have added lemon grass and soy sauce for an oriental style stock and it works well.
Rinse the chicken well under the tap and combine it and all of the other ingredients in a very large stock pot. Bring to a boil and reduce the heat to a gentle simmer. Cook for an hour or so until the chicken is tender but not falling apart. Remove the chicken and set it aside to cool. Return the stock and vegetables to simmer for another hour or two uncovered. Reducing the broth adds to the depth of
flavor.
Cool the broth then strain through a fine sieve and pack into containers to refrigerate or freeze. This will keep in the refrigerator about 10 days and in the freezer 6 months. I do not try to take any fat off until I have frozen or refrigerated the stock as it all goes to the top and solidifies and is very easy to remove in it's solid state. This batch yielded 4 quarts of lovely chicken stock which is happily waiting in my deep freeze until a day I need it.
I am making a big bowl of chicken salad today with the poached chicken and I may reserve and freeze some of the meat for soup.

Beef Stock:
To make beef stock and I would use the same ingredients as above except for beef bones and shanks instead of chicken. Add 4-5 more onions and a whole garlic bud. I also add turnips quartered if I have them and fresh tomatoes or a 12 oz. can of tomato paste.
The method is different as I lay all of the seasoned beef out on an oiled baking sheet lined with foil and roast it for about an hour in a preheated 400 degree oven. Then I add the tomatoes or tomato paste and roast another 30 minutes.
When the roasting is finished combine everything from the pan (you want all of the crusty bits) in the stock pot with the vegetables and seasoning. Cover an inch or two with tap water and bring to a boil. Reduce to the very lowest you can turn the burner to and leave to simmer 8 hours or overnight, checking and adding a bit of water if necessary should it start to boil away too much.
You must be sure you stove will simmer at a lowest temperature and not boil away and burn before you dare to leave it on overnight.
The next day remove the bones and meat and strain the beef stock. Package the stock and freeze as with the chicken stock and pick the beef from the bones. The beef can be frozen for soups and casseroles or made into BBQ for sandwiches. At any rate you have a nice addition to your larder and are a step closer to good soups and recipes calling for homemade stocks. Plus the house smells like heaven and usually inspires me to get going on some bread and another pot of soup!!

2/10/11

Mexican Albondigas a Flavorful Spicy Soup

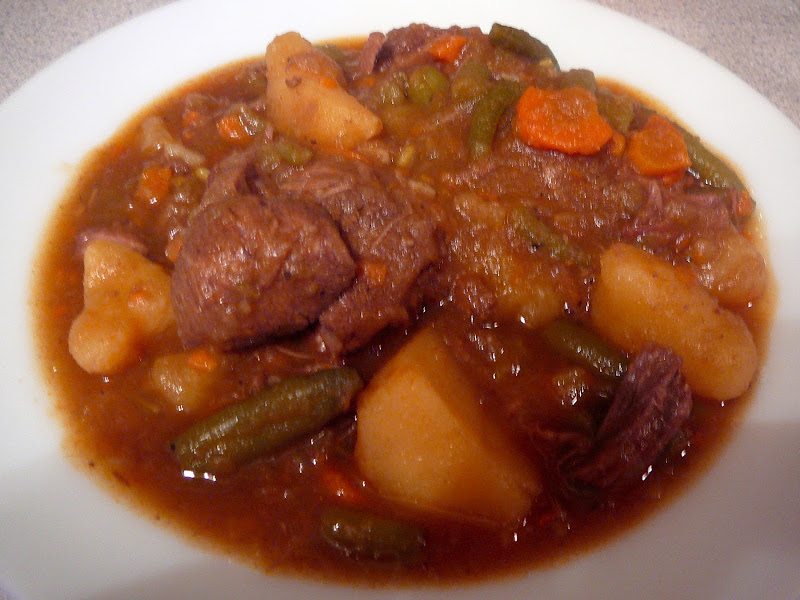
When I initially read the recipe for this soup I was taken with both the unusual combination of every day ingredients and the different preparation as well as content of the meatballs. It is chocked full of vegetables, rice, and low calorie protein. (Compared to meatballs full of ground beef and cheese.)
I had to try it and WOW. It is Really good. Brian loved it and his initial reaction when he saw zucchini in the kettle was to be very negative. So I was pleased when he suggested we have it again tonight!!
This recipe was adapted from a terrific new cookbook Brian got me for an early Valentine's Day. It is called, "mr. sunday's soups" by Lorrane Wallace. I have heard about it for a while now as Lorrane is the wife of Chris Wallace the political analyst on Fox news and he does the big Sunday morning interview and then heads home for lunch. Every week she has a hot kettle of soup on the stove ready and waiting for him and their children. There are more than 75 seasonal soup recipes in her collection and I will try at least 75% of them. They look that good!!

Here are the ingredients as I adapted this soup recipe:

The meatballs:

4 boneless skinless chicken thighs all fat removed ( or you may use 1 pound of breast meat), cut into 1/2" chunks
1 pound pork tenderloin cut into 1/2" chunks
1 medium shredded yellow squash ( about 1 1/2 C.)
1 C. rough cut fresh cilantro leaves
1/4 C. raw long grain white rice
1 large egg
1 t. kosher salt
1 t. freshly ground black pepper

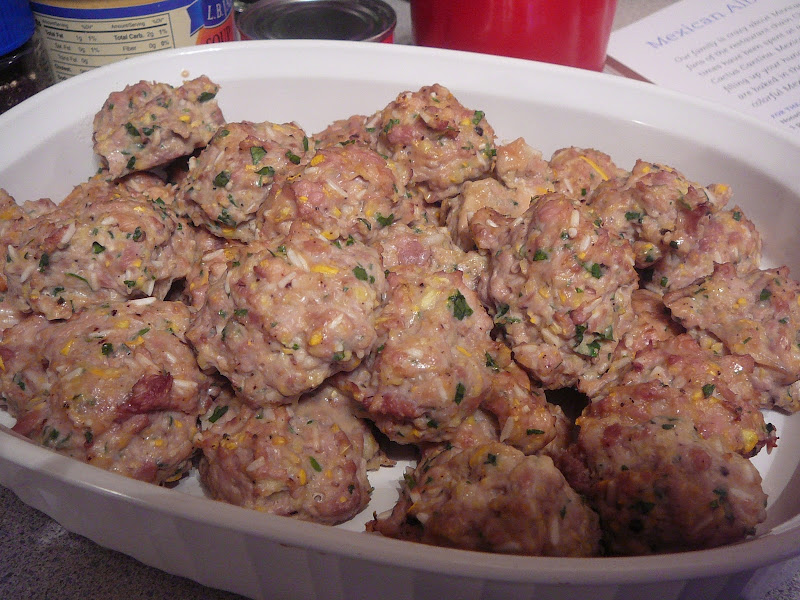
Preheat the oven to 400 degrees F. Spray a baking sheet with nonstick cooking spray. I line my baking sheet with foil and toss it at the end of the cooking for faster clean up.

Using a large food processor and the shredding disk process the washed and trimmed yellow squash. Dump the squash onto a plate and switch to the standard chopping blade. Return the squash to the processor bowl and add the chicken, pork, cilantro, rice, egg, salt, and pepper. Process for about 1 
minute until evenly blended.

Scoop out enough mixture to roughly form a 1" meatball. Drop by spoonfuls then form up a bit with your fingers onto the prepared pan. The mixture is wet.

Bake for 18 minutes until firm. Remove from the oven and set aside while you prepare the rest of the soup.
The soup: 

2 T. grape seed or olive oil
1 onion diced
1 red bell pepper seeded trimmed and diced
4 cloves fresh garlic minced
3 qt. chicken broth (12 C.)
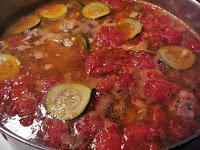
1 qt. frozen tomato from my garden or (15 oz. can of drained diced tomato)
4 oz. can chopped green chilies
1/2 C. raw long grain white rice
1 T. ground cumin
1 T. kosher salt
1 T. freshly ground black pepper
1 C. frozen white corn kernels
2 small zucchini thinly sliced
2 T. fresh lime juice

For serving:

Coarsely chopped fresh cilantro
Lime Wedges
Warm Corn tortillas
Diced fresh avocado

Place a large heavy bottomed kettle or dutch oven over medium heat and add the oil. Add the onion and bell pepper and cook for about 5 minutes until the onion is tender. Add the garlic stirring and cook an additional minute. 

Add the broth, tomatoes, chilies, rice, cumin, salt, and black pepper and bring to a boil. 

Using a slotted spoon lower the meatballs into the broth. Heat to simmering. Adjust the heat under the burner to maintain a gentle simmer. Adjust the lid to the kettle so it is not tight but allows steam to escape and simmer for 10 minutes. Add the corn and zucchini and simmer an additional 25 minutes until the rice is fully cooked. 

Remove from the heat and stir in the lime juice. Taste and adjust the seasoning if needed.
Ladle into warm bowls and serve with fresh cilantro sprinkled atop and lime wedges on the side.
I cut corn tortillas in strips and fried them until crispy and we also topped our hot soup with them!!


2/8/11

Biscuits

Pies' n' Thighs is the name of a New York restaurant known for these ultra tall, flaky, melt in your mouth biscuits demonstrated on Martha Stewart recently.  I couldn't resist trying them on a night I was fixing a down home meal of ham and beans and fried potatoes.  My husband does not like corn bread so it was my substitution for him.

My adaptation of the recipe make 18 large biscuits so I froze over half of them prior to baking but cut the recipe in half to post as not too many families around any more needing that quantity.

Ingredients:

1 C. plus 2 T. pastry flour (I used cake flour)
1 1/4 t. sugar
3 1/2 t. baking powder
2 1/4 t. kosher salt
12 1/2 T. cold butter cut in dice (1 1/2 sticks plus 1/2 T.)
3 C. all-purpose flour plus more for work surface
1 1/2 C. plus 2 T. buttermilk

1 large beaten egg
2 T. heavy cream

Preheat oven to 425 degrees F. and line baking sheet with parchment paper. Yield 8 or 9 large biscuits.

Place the pastry flour, sugar, baking powder, and salt in the bowl of a food processor and pulse until combined.   Add the butter and pulse until the mixture appears as coarse meal.  Dump mixture into a large bowl and add the all-purpose flour.

Make a well in the center of the flour and add the buttermilk mixing it all together until if become a dough.  Turn it out onto a well floured work surface and bring it together lightly kneading with the palm of your hand.   Pat the dough out to a thickness of 1 1/2"  thick and cut the biscuits with a well floured 3" round cutter.   Re roll the scraps as necessary and transfer all to the prepared sheet.

Using a cup or small bowl beat together the egg and cream.  Brush the biscuit tops and transfer to the oven for 5 minutes.  Reduce the heat to 400 degrees and bake until golden brown about 22 minutes longer.  Let them cool for 5 minutes on the baking sheet before serving.

2/6/11

Broccoli and Califlower Salad with Bacon


I am still pretending it is going to be spring just anytime now. I expect some might call it the onset of dementia or maybe worse maybe just being a dimwit!!! Oh well, as I sip my iced tea and enjoy this lovely salad. So be it. Seems a better thing to do than lament the snow and prospect of more.
Here is what you need for the salad:

3 crowns fresh broccoli separated and sliced into bite sized pieces
1/2 head fresh cauliflower separated and sliced into bite sized pieces
1/4 red onion diced
2 ribs of celery sliced
2 T. fresh parsley rough chopped
4 strips of bacon cut into small pieces and fried crisp, then drained
1/3 C. golden raisins
3 Oz. cheddar cheese grated

These ingredients make up the dressing:
1/2 C. Hellman's mayonnaise
1/2 C. Hidden Valley Ranch Dressing
2 T. sugar
1/4 t. salt
1/8 t. pepper

Assemble the vegetables in a mixing bowl and set aside. Stir the dressing ingredients together and pour over the vegetables. Stir in the golden raisins. Top with the bacon and cheese. Cover and refrigerate until serving time. Just before serving stir altogether and turn onto a large green cabbage or lettuce leaf.

2/4/11

Chicken Mushroom Lo Mein

Seems like not much is interesting and fun when cabin fever sets in and it has. All of the cold, snow, and wind has me tamped down. About as far as I get these days is out to the mailbox!! Maybe to the store once a week. I keep busy with my "projects" and they can be fun, but when it comes to mealtime it is a challenge to come up with something a little different and not stay down in the "rut" of same old thing all of the time.

Last night I scored a good one though!! I had some boned chicken thighs in the freezer and they led the way. Stir fried with fresh ginger, garlic, and red pepper flakes and companion ed with fresh mushrooms, onions, and bean sprouts they were a flavorful and healthy meal.

Here is what you'll need:

4 boned chicken thighs sliced for stir fry and fat removed
1 t. cornstarch
1/2 t. sugar
1/2 t. salt
1/4 t. black pepper

Stir the dry ingredients together and mix into the chicken, set aside.

4 ribs of celery sliced
1 lg. onion diced
1 bunch green onions sliced on the diagonal 1/2" including tops
8 Oz. fresh bean sprouts
8 Oz. fresh sliced mushrooms
2 cloves of fresh garlic chopped
3 T. fresh grated ginger
pinch of hot pepper flakes
6 Oz. cooked and drained Chinese noodles or spaghetti
2 t. sesame oil
3-4 T. Canola, Grape seed, or Peanut oil for frying
1/2 C. chicken stock or water
3 T. soy sauce
1 t. rice wine vinegar
1 T. Sake or Vodka
1 T. cornstarch

Cook the noodles according to package directions. Drain, rinse in cool water, sprinkle with 2 t. sesame oil and toss until coated. Set aside.

Heat wok or large flat bottomed pan over medium high heat until when you place your hand 2-3" above the bottom it feels like a hot radiator with the heat radiating from it. DO NOT TOUCH THE HOT PAN. .

Place the oil in the pan and swirl it around well. Add the chicken spreading it across the entire hot surface and stir fry until lightly browned. Remove the chicken and set it aside. Add a little more oil if you need to and add the diced onion and celery (not the green onion). Stir fry 2-3 minutes and add the garlic, hot pepper flakes, and ginger. Add the chicken back in and stir well. Add the mushrooms and stir fry 2-3 minutes then stir in the sprouts. Reduce the heat

Stir together in a cup or small bowl the chicken stock, soy sauce, vinegar, Sake, and cornstarch until well dissolved. Add to vegetables and chicken and stir until slightly thickened. Stir in noodles and green onion slices until heated through and serve with additional soy sauce on the side.

2/3/11

Cottage Cheese with Three Bean Soup

Lots of families have things they have paired up and eat uniquely their own. Elvis had his grilled peanut butter and banana sandwich, some eat scrambled eggs with ketchup. Among our exclusive odd but yummy pairings is beans and cottage cheeseI have never met anyone else who admitted to this pairing but I must say it is truly delicious. I think it came from my Dads' side of the family and it is any kind of hot bean dish, from green beans to baked, to bean soup topped with a generous portion of cottage cheese.

If it is a bean we want our cottage cheese topping it and only then is it ready to eat. I would never dream of cooking a pot of dried beans unless I had cottage cheese to go with it. My husband is an enthusiastic convert!

Here is what you need for the soup:

1 1/2 C. dry navy beans
1 1/2 C. dry great northern beans
1 1/2 C. dry pinto beans
1 gal. tap water for soaking
3 qt. chicken stock
2-3 chicken bullion cubes
2 bay leaf
1 lg. onion diced
2 cloves garlic mashed
1 fresh or dried hot pepper
2 C. diced ham (optional)
1 t. salt
1/2 t. pepper

Soak the beans overnight then drain and rinse well to get any sand or grit washed away. Pick any bad beans and remove them as necessary.

Combine in a large heavy bottomed kettle or crock pot the rest of the ingredients. If Using a crock pot turn on high and cook until done then reduce to low. If you are cooking on the stove I bring to a boil and turn back to medium until they soften and then I just simmer the rest of the day. You may need to add water if it becomes too dry.

When it is time to serve top with a generous dollop of cottage cheese and enjoy.


2/1/11

Fresh Lemomade by the Glass

My theory is I am going to act like spring is just around the corner and hope the groundhog sees his shadow or doesn't, whichever it is!!! In keeping with my fantasy I made up lemon syrup a couple of days ago and today I am enjoying the most refreshing fresh lemonade. If you would like to join me in a glass.....here is all you need:
Lemon Syrup
2 fresh lemons peeled with a veggetable peeler and julianned
2 C. sugar
2 C water
Using a small saucepan add the thin strips of peel, sugar, and water and bring to a boil to dissolve the sugar. Cool and refrigerate in a covered glass jar.
Lemonade by the glass:
3 oz. lemon syrup
juice of 1/2 fresh lemon
ice
water
Mix in a glass and enjoy. You may alter to taste depending on the size of your glass. You may also use carbonated water if you like a bit if fizz!!